Sunday, August 21, 2011

Dirt Under Our Nails and Paint In Our Hair

There are several projects we still want to tackle in the backyard, one of which is growing a vegetable garden. We still have a lot of work to do to actually set the garden up, but we took a couple of small steps last month when Alton bought two 55 gallon barrels (originally used to ship olives) for only $16 each and turned one into a composter and one into a rain barrel. The composter is complete and has been accumulating our plant and paper waste for a while now, as you can see.


Alton spray painted it black so that it would get hotter and break everything down faster. He built a base for it and the whole thing is on a pipe so we can easily flip it over to mix the compost up.

The rain barrel is not yet hooked up because we actually need to have gutters installed to direct rainwater into the barrel. This is it currently. We plan to spray paint it white as a base color to eventually paint some sort of fun design on it.


And in other backyard news, look how big the chickens are! They should be laying eggs any day now.


So that about covers the first half of this post's title. As for the paint in our hair, well our ceilings are not white. They are very light beige, which won't match at all once we paint the walls grey. So we decided to paint the ceilings white. All of them. So far we have only done the craft room because it was completely painted the day before the Art League came to see it. (Yay procrastination!)

Painting ceilings is not fun. Just FYI.


So the ceilings of the craft room were painted as well as the walls. I also painted a couple of cabinets that the previous owners left in the attic. Here they are before:


During:


And after:


And here is the entire room, all painted and neat:


Yes, the cat has an entire wall for her stuff.

Looking good, eh? We still need crown molding, a new fan/light, new blinds (the ones in there are yellowed and brittle), and new door hardware (which we need throughout the whole house). I also plan to get some curtains and to put up a big, custom bulletin board on one wall and a shelf on the other, over the L shaped desk. The craft room is really coming together. I even cleaned out the closet. :)


Sunday, July 17, 2011

In the Meantime...

No, we still have not finished the patio railing. We are about 90% there, but the gates need to be tweaked a bit and about half of the railing still only has primer and no paint on it. We have been waiting for a day that Alton is off and it is not raining, but that just hasn't happened recently. In the meantime, we have done a few more projects around the house. We've been sitting on a $30 Target gift card since Christmas and finally used it to buy a soap pump, tissue cover, towel ring, and toilet paper roll holder for the hall bathroom. (We've changed our vision for that bathroom since the previous post I wrote about it, but more on that later.)


 T.P. holder and towel ring before:


...and after:


 The whole shebang:

As you may be able to tell from our accessory selection, we've decided to step away from the coastal vibe we were leaning toward and go with a more modern one. We think it will tie in to the rest of the house better that way. We moved the old towel holder from this bathroom into the master because the previous owners had a towel ring on one side of the vanity in there and a fleur de lis hook on the other side, which we removed. So Alton's side has been towel ring-less for a while and the one we replaced in the hall bath was exactly the same as the one in the master on my side of the vanity.

No towel ring = sad, droopy countertop towel:

Towel ring = happy wall towel.


Ah, bathroom harmony.

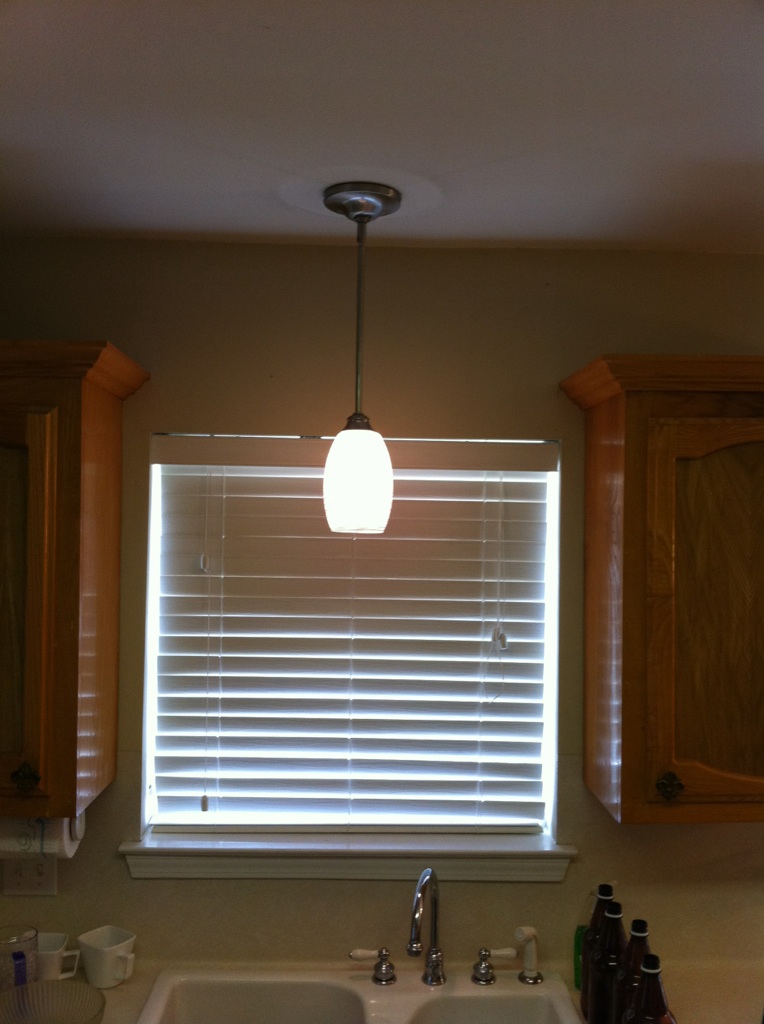
There just so happens to be a Lowe's next to the Target we went to for our new bathroom accessories, so we stopped by there to look for something completely different (I'm sure you know how that goes) and walked out with a new pendant light to go above the kitchen sink.

The old fixture:
Here's the new one with the light off:


                                                                           light on:


I love the stripey pattern when the light is on.

So those are the small, indoor projects we've been working on while waiting to finish the railing. Also, my aunt sent me home with a set of wicker furniture when I went over there for the 4th, so here is a shot of our new, free (!) furniture with a sneak peek of the railing in the background:

You can see what I was talking about with all the rain lately in that rather gloomy photo...I'll be back soon with details of the recent eco-friendly project Alton did and hopefully a completed railing. In the meantime we will be choosing the perfect shade of grey for our living room, kitchen, and dining room. Stay tuned!

Friday, June 3, 2011

Baby Steps

While we were building up the funds to purchase patio railing materials, we made a few small changes around the yard and house, so I figured I would share those changes.

First, we just happened to glance at the price of new doorstops while at Home Depot a few weeks ago. They were around $1.75 or so. We thought about buying some because our current ones were (like all the other hardware in the house) brassy gold. Except the ones in the bathroom. Those were...rust colored. Ew. Anyway, we needed to run by the Habitat for Humanity Re-Store later that day, so we held off on buying the ones at Home Depot just in case they had some at the Re-Store. To our delight, they not only had new shiny silver doorstops, but they were only $0.30 a pop! So we now have all new shiny doorstops for only a few bucks. Woo!

Next, we decided that we wanted to get rid of the jellybean shaped flowerbed in the corner of the front yard and replace it with the weeping willow tree from the backyard. We haven't transplanted the tree yet, but we did pull up the concrete pavers that were outlining the jellybean bed and put down a circle of bricks to go around the tree, which matches the brick circles around the four Bradford Pear trees in the front yard. We're on the corner, so there are two in front of the house and two on the side. The jellybean bed was in the corner.


We also still need to get as much of that extra mulch up as possible and plant some grass seeds in the old jellybean shape.

Lastly, we decided that our old living room light fixture (from our old apartment, which weirdly didn't have any overhead lighting) would look best over my laptopping/reading chair in my craft room, so we hung that up. Here are some photos of that.

 Before
After

We still have lots to do in there. Soon, actually, because I volunteered to show it off in a studio tour hosted by the local art league. Gulp. If a bunch of strangers coming to view your space isn't motivation to get it finished, I don't know what is...

And in closing, here are some photos of flowers that recently bloomed in the yard:


 I pruned this rosebush back A LOT recently. I'm pretty sure I got rid of more of it than I kept, but it looks a lot less wild and mangy now.
I got four of these hanging baskets and four kinds of flower seeds to put on the existing hooks on the fence in the backyard. I'll post more photos when (and if) they bloom.


Tuesday, May 10, 2011

The Eagles (Chickens) Have Landed!

I know it's been a while since my last post. Getting the coop finished took a bit longer than expected, but we finally finished it and moved our newest family members into their sweet digs yesterday. In case you are wondering, Alton found plans for the coop here: http://poultry.purinamills.com/stellent/groups/public/documents/web_content/ecmd0007989.pdf and modified the plan to be warm-weather friendly by making two of the sides out of mesh rather than solid panels. He also built a single-level roost out of 2x4s instead of the three-level roost made of dowels that the plan suggested. We also embellished it with a decorative sign. (Pretty much my only contribution to this project besides a wee bit of the painting.) We're really pleased with the result and the ladies seem to be enjoying it so far as well.

So instead of a long how-it-was-made narrative, I'll let these photos tell the story:
The first batch of materials. We brought the metal roofing back and went with shingles.
Ready to get started - the materials are all laid out on the patio, I mean Alton's workshop.

Things are starting to take shape. We changed the solid floor to 1/2 inch mesh later.

This is the front with a hole cut out for the egg box (top) and door.

The back. We cut a big square out to make a door so we can easily get in there to clean and refill the chickens' food and water.

Here you can see where we took down the sides and the floor to replace with mesh. I was concerned about them walking on the mesh, but once they are big enough to roost they will stay either on their 2x4 perch or in the egg box. For now we have a piece of cardboard down for them to walk on.

The roof goes on!

The perch goes in!

Front door.

Back door.

Egg box.

Interior view taken from the back. they have the 2x4 perch as well as a little perch to help them into the egg box. We borrowed my dad's old shovel and broke the handle, so it was repurposed as a mini perch. (Don't worry, the shovel was already cracked and super old - we aren't that tough on yardcare equipment. I hope.)

Shingling begins. (Also, "shingling" is a fun word. Go ahead. Say it.)

Shingling is complete!

We decided to paint it a nice barn red.

We named it The Lucky Rooster Saloon because of the three lovely ladies who live here.

And here's the finished product in our backyard.

And that's our coop. The next project we need to do is enclose our patio so that the chickens don't get up there and poop all over it or cross it to get out of the yard.

And now for some photos of our new babies. Oh, I explained the names in my last post. We decided that the white chick is RZR, the black chick is Scooter, and the brown chick is Rickshaw McGraw.